Updated April 2014 for adding Google AdSense to WordPress 3.9 themes: TwentyFourteen theme example.
As you can see I use the AdSense program on this website, with an an AdSense ad floating to the right of this text. The Premium WordPress theme I develop (running on this site) is AdSense ready, if you wish to skip editing a WordPress theme template files, go buy a copy of Stallion Responsive which includes AdSense, Chitika, Kontera and Infolinks ad networks built in plus the ability to add custom ads as well!.
This post will explain how other WordPress 3.9 theme users can achieve a similar use of AdSense on their WordPress blogs without buying a premium theme (cheap skates :-)), will be using the default WordPress theme TwetyFourteen as the example.
Adding AdSense to your WordPress Theme
WordPress has quite an easy to use template system, trust me I’ve tried many popular blog CMS’s and WordPress is by far the easiest to use.
I use a HTML editor (just a basic text editor not unlike Notepad) for major template work and the built in editor for small changes. I prefer using an offline text editor since you can easily backup your work as you go along, not as easy with the online WordPress theme editor and when a theme is updated all your edits are lost unless you use a child theme (which aren’t hard to create).
I’ll only deal with the WordPress built in theme editor for this post since explaining FTP (not familiar with FTP use Filezilla, it’s free) etc… is too much for one post.
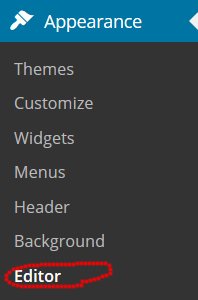
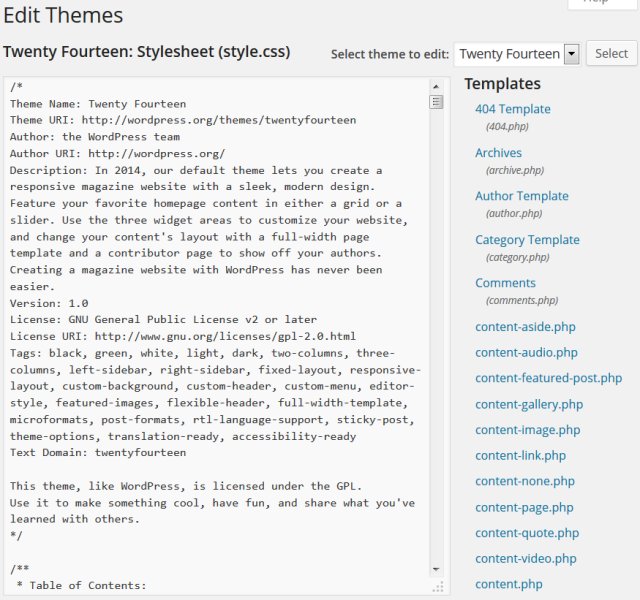
Login to your WordPress blogs Dashboard and on the left menu click the “Appearance”, followed by the “Editor” link which will open up the WordPress built in template editor.
You should see a page like this in WordPress 3.9+, this will likely change cosmetically in WordPress 4, WordPress 5 etc… WordPress development are always changing what the backend of WordPress looks like, but the general template editor feature always stays the same, somewhere under “Appearance”.
To emulate the same AdSense layout I have on this site (3 content ad units) requires multiple template file edits.
Update 2014: at this point decided to look for a better way to add AdSense to WordPress since WordPress has changed and now requires a lot of template edits if you use the way I suggested below. Have a good idea how to achieve 3 content ad units by adding one large snippet of code to the functions.php file, so stopping editing this article while I create the PHP code. Will update soon.
You can see from WordPress post pages like the one you are reading now there are multiple Google AdSense Ads on the page. You should be aware at this point you can only use three AdSense content ad blocks per page (you might find Make the most of your ad units http://adsense.blogspot.com/2005/10/make-most-of-your-ad-units.html helpful). This makes adding the AdSense code a little trickier than if you could add unlimited ad blocks, but with a little thought it’s possible.
So three AdSense for content ad blocks is what we are aiming for, to achieve this I added one Wide Skyscraper (160 x 600) ad block to the side menu, one Square (250 x 250) ad block and one Banner (468 x 60) ad block to the content to WordPress posts.
Adding AdSense Ads to the Menu (non widget)
If you use widgets skip to the next section. If you don’t use widgets I strongly advise learning about them, you can build your menus exactly how you want them without having to edit the template files. With WordPress 3.0+ pretty much all WordPress themes are widgetized now.
Using the WordPress Theme Editor open the file Sidebar (sidebar.php). The actual code will vary depending upon which template you are using, this is for the WordPress theme Almost Spring, but will be relevant for most themes.
You will see code like this-
<div id="sidebar">
<ul>
<?php wp_list_pages('title_li=<h2>' . __('Pages') . '' ); ?>
<li>
<h2></h2><h2>< ?php _e('Archives'); ?></h2>
<ul>
<?php wp_get_archives('type=monthly'); ?>
</ul>
The simplest way to add your AdSense block is to insert it near the top-
<div id="sidebar">
<script type="text/javascript"><!--
google_ad_client = "pub-8325072546567078";
google_ad_width = 160;
google_ad_height = 600;
google_ad_format = "160x600_as";
google_ad_type = "text_image";
google_ad_channel ="";
google_color_border = "E8E7D0";
google_color_bg = "FFFFFF";
google_color_link = "B96F17";
google_color_url = "B96F17";
google_color_text = "000000";
//--></script>
<script type="text/javascript"
  src="http://pagead2.googlesyndication.com/pagead/show_ads.js">
</script>
<ul>
< ?php wp_list_pages('title_li=<h2>' . __('Pages') . '' ); ?>
<li>
</h2></h2><h2>< ?php _e('Archives'); ?></h2>
<ul>
< ?php wp_get_archives('type=monthly'); ?>
</ul>
Note: You’ll need to replace my google_ad_client with your code otherwise I’ll be paid for all your AdSense clicks!
This would put the AdSense ad right at the top of the menu. You can see from this blog it’s possible to put the ad block lower on the menu, I have it between Categories and Archives. So feel free to experiment with it’s placement.
You may find wrapping the AdSense code in a div helpful since you can then add padding etc…-
<div style="padding-left:5px; padding-right:5px; padding-bottom:5px; padding-top:5px; ">
<script type="text/javascript"><!--
google_ad_client = "pub-8325072546567078";
google_ad_width = 160;
google_ad_height = 600;
google_ad_format = "160x600_as";
google_ad_type = "text_image";
google_ad_channel ="";
google_color_border = "E8E7D0";
google_color_bg = "FFFFFF";
google_color_link = "B96F17";
google_color_url = "B96F17";
google_color_text = "000000";
//--></script>
<script type="text/javascript"
  src="http://pagead2.googlesyndication.com/pagead/show_ads.js">
</script>
</div>
You can then edit the div’s style to match your sites positioning by adding more or less padding, the above code gives 5 pixel of padding around the entire AdSense block, padding is very useful when your Ad block doesn’t quite line in with the rest of the menu (try 10 for all values to see what it looks like).
When complete click the Update File button within the Theme Editor and all your pages will now have a Wide Skyscraper (160×600) AdSense ad on the side menu.
If you find the file won’t save (if you see the message “If this file were writable you could edit it.” where the Update File button should be) you will have to change the files write permission (needs to be 666). To do this access your site via FTP and navigate to /wp-content/themes/YOUR-THEME/ now select all files in the directory and change permission to 666 (it will probably be 644). You can find more info about this at WordPress support forums.
Adding AdSense Ads to the WordPress Sidebar Via a Text Widget
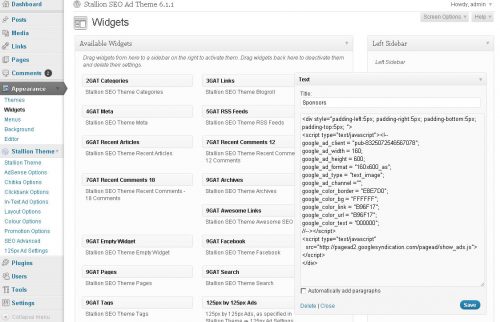
Log into your WordPress Dashboard, click “Appearance” on the left menu followed by “Widgets”.
On the Widgets page you’ll see a list of widgets, near the bottom is one called “Text” with the description “Arbitrary text or HTML”.
Drag and Drop this Text widget to the sidebar widget area you want an AdSense ad on (will work with any ad code, not just AdSense).
On the right side of the page a new Widget called Text will appear.
In the new form that opens paste the following:
In the single line box name the widget something like “Sponsors” : note this will be used as the menu heading, you see this on your blog, if you just want the AdSense ad unit with no menu heading leave this box blank.
In the large second box add
<div style="padding-left:5px; padding-right:5px; padding-bottom:5px; padding-top:5px; ">
<script type="text/javascript"><!--
google_ad_client = "pub-8325072546567078";
google_ad_width = 160;
google_ad_height = 600;
google_ad_format = "160x600_as";
google_ad_type = "text_image";
google_ad_channel ="";
google_color_border = "E8E7D0";
google_color_bg = "FFFFFF";
google_color_link = "B96F17";
google_color_url = "B96F17";
google_color_text = "000000";
//--></script>
<script type="text/javascript"
  src="http://pagead2.googlesyndication.com/pagead/show_ads.js">
</script>
</div>
Don’t forget to change the google_ad_client = “pub-8325072546567078”; to use your pub code.
You might need to play around with the padding numbers, currently all set at 5px, if you find you need more padding on the left change padding-left:5px; to padding-left:10px; and see how it looks….
Should look something like this-
I called the widget “Sponsors” which will be the menu heading on your blog.
Click the “Save” button and your new AdSense widget will be live.
If you aren’t familiar with widgets and this is your 1st use of WordPress widgets you’ll only have the AdSense ad unit on your sidebar menu. Drag and drop other widgets you want on that sidebar widget area.
And that’s how you add AdSense to your WordPress sidebar using a widget.
Adding AdSense Ads Within the Content of Posts
Now we come to the tricky part, we want individual post pages (like this one) to have an AdSense ad within the content (will result in more clicks = more revenue), but we can’t have 10 AdSense ads on every archive and similar pages.
Fortunately WordPress templates have a file called Single Post (single.php) load it into the theme editor and you should see something like this-
<div class="postentry">
<?php the_content(__('Read the rest of this entry »')); ?>
<?php wp_link_pages(); ?>
</div>
Add the AdSense code for a Square (250 x 250) ad block as follows (note the div with the float right styling, this is important).
<div class="postentry">
<div style="float:right; padding-left:5px;">
<script type="text/javascript"><!--
google_ad_client = "pub-8325072546567078";
google_ad_width = 250;
google_ad_height = 250;
google_ad_format = "250x250_as";
google_ad_type = "text_image";
google_ad_channel ="";
google_color_border = "E8E7D0";
google_color_bg = "FFFFFF";
google_color_link = "B96F17";
google_color_url = "B96F17";
google_color_text = "000000";
//--></script>
<script type="text/javascript"
  src="http://pagead2.googlesyndication.com/pagead/show_ads.js">
</script>
</div>
<?php the_content(__('Read the rest of this entry »')); ?>
<?php wp_link_pages(); ?>
</div>
When the file is updated all your WordPress single post pages will have a square AdSense ad floating to the right of the posts content, but the same posts on archive and similar pages will have no ad block. This ad will most likely generate most income because it’s in a hot click area (see AdSense Heat Map).
That leaves the third and final AdSense ad block which I’ve added just above the comment area of the blog page. To add this we again edit Single Post (single.php) using the WordPress built in theme editor.
<div class="postentry">
<?php the_content(__('Read the rest of this entry »')); ?>
<?php wp_link_pages(); ?>
</div>
<p class="postfeedback">
Add the AdSense code for a Banner (468 x 60) ad block as follows.
<div class="postentry">
<?php the_content(__('Read the rest of this entry »')); ?>
<?php wp_link_pages(); ?>
</div>
<script type="text/javascript"><!--
google_ad_client = "pub-8325072546567078";
google_ad_width = 468;
google_ad_height = 60;
google_ad_format = "468x60_as";
google_ad_type = "text_image";
google_ad_channel ="";
google_color_border = "E8E7D0";
google_color_bg = "FFFFFF";
google_color_link = "B96F17";
google_color_url = "B96F17";
google_color_text = "000000";
//--></script>
<script type="text/javascript"
  src="http://pagead2.googlesyndication.com/pagead/show_ads.js">
</script>
<p class="postfeedback">
If you find there isn’t enough room try a smaller width ad. You might have to add a div with center text align to make it look right.
This last ad block will probably be low click thru because of it’s location.
If you want these AdSense ad unit on your static Pages like the About page edit the page.php template file as well.
And there you have it three Google AdSense ad blocks added to a WordPress blog. If you use my technique and want to say thanks link to this page (or the home page) from your blog. Also feel free to add a comment below, love to see others using my ideas.
Adding AdSense Ads to More WordPress Pages
The instructions above adds AdSense ads to Single posts and static Pages and the sidebar sitewide. This leaves no main content ads on the home page, archives, categories, tags and search results pages leaving advertising revenue on the table. If you would like to achieve AdSense ads on an entire WordPress installation and even more ad networks see the Stallion WordPress SEO AD Theme which includes AdSense, Chitika, Clickbank, Kontera, Infolinks and Linkwords ad networks built in!

Adsense for Wordpress from Adsense Account
i want to use my blogspot Adsense into my WordPress based website how can i use it..na din my wordpress website we want adnsesne script how can i get from Adesnse Account
Responsive AdSense WordPress Theme
Stallion 8 will include responsive AdSense ads without having to add your own AdSense ad units (you won’t have to create multiple AdSense ad units within your AdSense account and paste them into a themes options page), like with Stallion 7 add your AdSense pub-###### code once and Stallion generates the rest of the ad units. As far as I’m aware no other theme or AdSense plugin does what Stallion 8 will do.
AdSense has released responsive AdSense code, it’s Responsive Ad Unit Beta. When you add a responsive ad unit to a site (by going to your AdSense account, create a Responsive Ad Unit Beta including setting font colours etc… and copy and paste the entire code to a theme/plugins options page) AdSense will automatically choose the best ad size for the device size, basically it will scale down.
The problem with this approach is it sucks for WordPress theme and plugin developers and the user, we have to supply a form for entering entire ad units that the user has to create under their AdSense accounts (to replicate what Stallion 7 does you’d need to create 7 AdSense ad units) and this tends to result in copy and paste mistakes: In Stallion 7 (and Stallion 8) all you have to add is the pub-############ code once, yet I’ve had dozens of support requests due to mistakes in copying and pasting!
Currently testing Stallion 8 live at http://www.seo-consultant-services.co.uk/. I can’t show every feature on one site, but you can see the responsive AdSense ads in action and the top header image responsiveness including Stallion 8s new responsive navigation menu.
Easiest way to test the mobile responsiveness of a site on a desktop PC is load it in a browser (Firefox, IE, Chrome…) and slowly reduce the size of the browser window: this quickly emulates various device widths (I don’t own a dozen mobile phones for testing :-)) and it’s much quicker than using a mobile device emulator.
Stallion 8 is mobile optimized for the following device screen widths : 1,000px (Desktop), 800px 720px 640px 600px 540px 480px 400px 360px, 320px and 240px. I believe this covers the vast majority of device widths, if anyone thinks I’ve missed some…
David
Responsive AdSense WordPress Theme
Adding AdSense Responsive Ad Unit Beta to WordPress Themes
In Stallion 8.0 not only are the default Stallion AdSense ads mobile responsive, but you can use the new AdSense Responsive Ad Unit Beta code.
In Stallion 8.0 each AdSense ad unit (there’s 7 of them: 4 content ad units and 3 link ad units) has it’s own settings including size, type and individual colour options (individual colour options new to Stallion 8.0).
There’s also an override box for each ad unit (so 7 of them) where you can paste entire AdSense ad units (created under your Google AdSense Account) OR another ad system (in theory you could add any code or content) that will replace the Stallion AdSense ad unit.
Since in Stallion 8 the default AdSense ads are mobile responsive, it would be a feature downgrade to add a standard AdSense ad unit (created under your Google AdSense account) since they aren’t mobile responsive. For example the Stallion main content ad unit (the one that floats in the main content) changes to a 250x250px ad unit for mobile devices with a screen width between 240px and 320px and for smaller screen sizes to a 180x150px ad unit, doesn’t matter what you set that ad to in the AdSense settings it changes size to match the screen width. You would loose this mobile responsive feature if you added a standard content ad unit from your AdSense account.
However, Google AdSense has released AdSense Responsive Ad Unit Beta which includes mobile responsive code which will work with Stallion 8.0 The new AdSense Responsive Ad Unit Beta code looks like this (this was the default code AdSense created):
<style>
.responsive { width: 320px; height: 50px; }
@media(min-width: 500px) { .responsive { width: 468px; height: 60px; } }
@media(min-width: 800px) { .responsive { width: 728px; height: 90px; } }
</style>
<script async src="//pagead2.googlesyndication.com/pagead/js/adsbygoogle.js"></script>
<!-- Responsive -->
<ins class="adsbygoogle responsive"
     style="display:inline-block"
     data-ad-client="ca-pub-8325072546567078"
     data-ad-slot="1153997214"></ins>
<script>
(adsbygoogle = window.adsbygoogle || []).push({});
</script>
What this responsive AdSense code does is for screen sizes
Above 800px sets a 728x90px ad unit,
Between 500px and 799px sets a 468x60px ad unit,
and sets a 320x250px ad unit for all other sizes (anything below 499px).
These sizes won’t match many themes as is, but by changing
{ width: 320px; height: 50px; }
@media(min-width: 500px) { .responsive { width: 468px; height: 60px; } }
@media(min-width: 800px) { .responsive { width: 728px; height: 90px; } }
You can match various ad units to whatever mobile screen sizes you like, for example this one would match the Stallion 8.0 default Main Content Ad Unit.
<style>
.responsive { width: 180px; height: 150px; }
@media(min-width: 240px) { .responsive { width: 250px; height: 250px; } }
@media(min-width: 320px) { .responsive { width: 300px; height: 250px; } }
@media(min-width: 800px) { .responsive { width: 336px; height: 280px; } }
</style>
<script async src="//pagead2.googlesyndication.com/pagead/js/adsbygoogle.js"></script>
<!-- Responsive -->
<ins class="adsbygoogle responsive"
     style="display:inline-block"
     data-ad-client="ca-pub-8325072546567078"
     data-ad-slot="1153997214"></ins>
<script>
(adsbygoogle = window.adsbygoogle || []).push({});
</script>
Why bother I hear you sigh?
Well the new AdSense Responsive Ad Unit Beta code is asynchronous ad code which is supposed to result in better web performance. Basically it will load faster and since Google search engine rankings have a speed element anything you can do to increase site speed is a positive SEO signal.
After I release Stallion 8.0 I’ll release the relevant AdSense Responsive Ad Unit Beta alternative codes to the Stallion defaults, so you can either stick with the easy to setup defaults (add your pub-NUMBER once and you are done) or create and edit up to 7 AdSense Responsive Ad Unit Beta ads (that would be fun for the 130odd domains I own!!!!).
David
Adding AdSense Responsive Ad Unit Beta to WordPress Themes
Thanks!
This helped me add the text widgets that I needed to break away from the ugly pro theme I had been using. Twenty fourteen is much more attractive. I expect that I can customize it more but this is a good start. Thanks!