First things first, Google considers HTTPS/SSL Certificates as a ranking factor, it’s important to run your site via HTTPS:// (secure on port 443) not HTTP:// (unsecure on port 80) if you want to maximise search engine rankings.
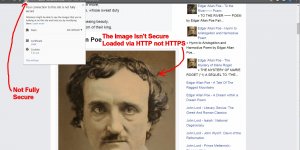
If you want your site to run via https:// without a warning you have to install a valid SSL certificate. Below is a screenshot in Google Chrome of one of my sites sub-domains which lacks a valid SSL certificate.
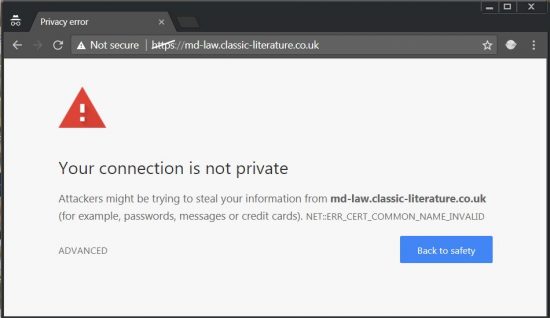
Google Chrome Your Connection Is Not Private Warning
SSL certificates aren’t cheap if you own a lot of domains (I’ve owned up to 200 domains at a time), so using free SSL certificates saves a nice chunk of change I can use on drugs n drink :-)
I’m using Let’s Encrypt free SSL certificates and installing them using Certbot.
Note: After figuring out how to install Let’s Encrypt certificates via Certbot and writing the Let’s Encrypt tutorial below I discovered the control panel I use (Virtualmin) has a built in Let’s Encrypt module which does some of the heavy lifting below. I wrote a tutorial for Virtualmin users as part of the Moving a WordPress Site from HTTP to HTTPS SEO tutorial.
Using Certbot Under Centos 6.9
My sites run on an Apache Godaddy VPS (Virtual Private Servers) running Centos 6.9 and I use the control panel Virtualmin. I have full root access to the server and installed the certbot script using SHH and managed the virtualhost directive files (creating new ones etc…) via Virtualmin (see later for details).
If you aren’t familiar with SSH access you’ll need an SSH program to connect to your server using SSH: SSH programs tend to be command line (type instructions in) which can be a pain :-)
Certbot provides a useful options selection page on their site which provides specific SSH instructions for various server setups, I used the Apache : Centos 6 Certbot Instructions, but the instructions are for a non-root user (sudo user) and I log into the server as the root user.
If on a Godaddy server, Godaddy ‘blocks’ root access by default for security reasons (can’t log directly into SSH as root, have to log in as a user a hacker is highly unlikely to know the username of), but logging in as the root user gives access to everything and it’s pretty easy to do.
Login to SSH with your SSH USERNAME, and PASSWORD.
Type su – and press enter, use the same PASSWORD as before and you are now logged in as the root user.
Certbot Install
After logging in as the root user copy and paste these commands into your SSH program.
First download the script to your server:
wget https://dl.eff.org/certbot-auto
Install the certbot-auto script:
chmod a+x certbot-auto
Run the certbot-script, this is also the command to use each time you want to make a change to an SSL certificate or add new domains to the certificate etc…:
./certbot-auto --apache
The Centos 6 Certbot instructions (on the Certbot site) says use sudo ./path/to/certbot-auto renew, as I’m logged in as root I removed the sudo part.
Certbot will look through your virtualhosts directives for domains and sub-domains on the server, as a Centos 6.9 user this is where I ran into problems. Certbot assumes each domains/sub-domains virtualhost directives are stored in separate configuration files: basically if your server has 20 domains/sub-domains Certbot is looking for 20 *.conf files.
If after going through the Certbot options there’s an error Certbot can’t create the conf files, you’ve probably got all your virtualhost directives in one file (that’s how my Centos 6.9 server was setup). Go to the Modifying Centos 6.9 Virtualhost Directives for Certbot Use section below to fix this issue then rerun the above command.
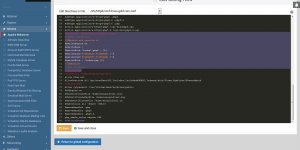
The screenshot below shows the output of the ./certbot-auto –apache command, I selected 8 domains/sub-domains (65,66,67,68,69,70,71,72 all part of stallion-theme.co.uk – so SSL cert for just one domain) and after testing the https:// version worked (loaded https://stallion-theme.co.uk/ in a browser if there isn’t a Your Connection Is Not Private Warning it worked) selected 2 for the automatic redirection option. By selecting 2 the http:// version automatically redirects to the https:// version (https://stallion-theme.co.uk/ 301 redirects to https://stallion-theme.co.uk/).
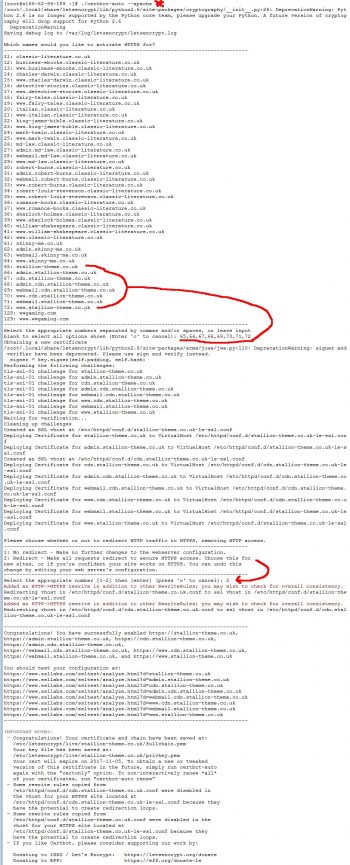
Create Single Free SSL Certificate with Certbot
If something goes wrong with the automated redirect you’ll find the new 301 redirect code within the http:// (port 80) conf file, for this site it’s within “/etc/httpd/conf.d/stallion-theme.co.uk.conf” and “/etc/httpd/conf.d/cdn.stallion-theme.co.uk.conf”.
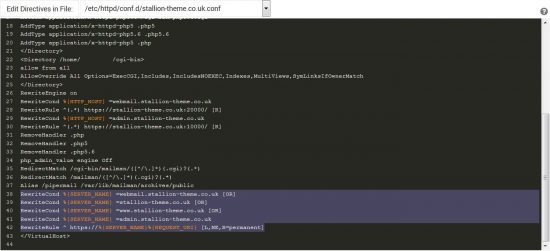
Certbot https 301 Redirects
In the screenshot above the purple highlighted text are the new 301 redirect rules for the main domain, if something went wrong with the redirects I’d manually delete those new lines. I’d make a similar change for the cdn sub-domain file “cdn.stallion-theme.co.uk.conf” as well.
Assuming everything went to plan you’ll have your original (but modified) http:// (port 80) files “/etc/httpd/conf.d/domain.tld.conf” and new https:// (post 443) files “/etc/httpd/conf.d/domain.tld-le-ssl.conf” for each domain/sub-domain.
For this site I have:
/etc/httpd/conf.d/stallion-theme.co.uk.conf - http port 80
 /etc/httpd/conf.d/cdn.stallion-theme.co.uk.conf - http port 80
 /etc/httpd/conf.d/stallion-theme.co.uk-le-ssl.conf - https port 443
 /etc/httpd/conf.d/cdn.stallion-theme.co.uk-le-ssl.conf - https port 443
At this point we have a single SSL certificate for this sites main domain and the CDN sub-domain. Since the SSL cert is working, the next step is setting up an automated renewal (a cron job) of the free Letsencrypt certificate.
Auto Renewal of Free Letsencrypt SSL Certificates
The free Letsencrypt SSL certificates expire every 90 days, so unless you plan to run a manual update every 89 days you’ll need to setup auto renewal.
First step is a dry run test (test the renewal works).
While logged into SSH run this command:
./certbot-auto renew --dry-run
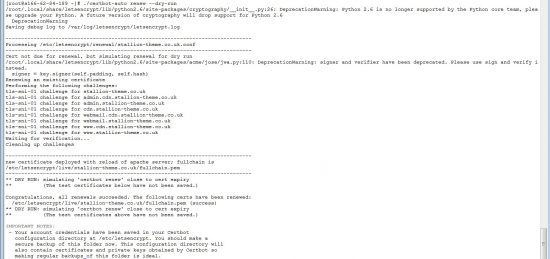
Certbot Auto Renew Dry Run Output
If there’s no problems you can safely setup a cron or systemd job for
./certbot-auto renew
It’s recommended the cron job runs twice a day so if your SSL certificate is revoked your https:// version of your site doesn’t go down.
If auto renewal fails and your site is down log into your server via SSH and run this command:
./certbot-auto renew
This will renew the certificate for another 90 days and you can go troubleshoot what went wrong with the auto renewal process :-)
I use Virtualmin’s built in cron job editor under “Webmin” >> “System” >> “Scheduled Cron Jobs” and created a new cron job with these settings:
Run at 5:47 and 17:47 every day (runs twice a day around quarter 6 in the morning and evening). I selected minute 47 because a lot of people will select on the hour, so 47 minutes passed will result in a lower probability of not being able to connect to the Letsencrpt server. It’s like everyone getting up on a ad break to make a cup of tea, there’s a surge of users :-)
Don’t use 47 minutes past AND 5 and 17 hours like I have, use another minute (like 33 or 52 or 27) and different hours (like 3 and 15, or 1 and 13, or 9 and 21). This will setup a cron job to run every 12 hour, but at different times for each user (this spreads the load on the Letsencrypt server: if everyone uses the same time their server could crash!).
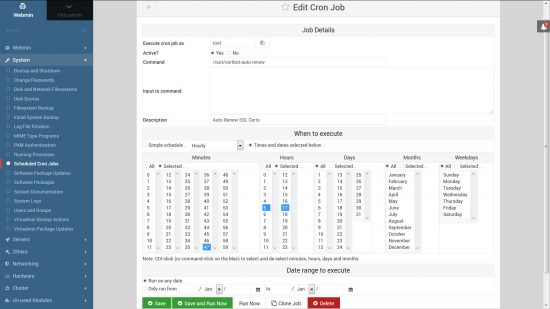
Webmin Scheduled Cron Job
I also tested the cron job to make sure it works:
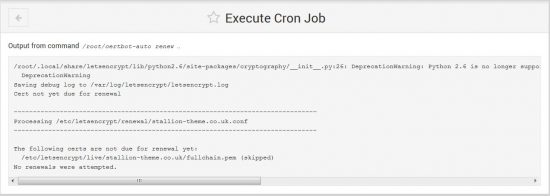
Execute Certbot Cron Job Output
I believe the equivalent SSH command is something like this (untested):
crontab -e
You want a command something like this:
47 05,17 * * * /root/certbot-auto renew --quiet --post-hook "service httpd reload"
That should create the same cron job, but I haven’t tested. Thanks goes to the user “sahsanu” on the Letsencrypt forum for the above command format.
Note: my server installed the certbot-auto script inside the /root/ directory, hence the /root/.
Modifying Centos 6.9 Virtualhost Directives for Certbot Use
Centos 6 by default stores all the virtualhost directives within the one file “/etc/httpd/conf/httpd.conf”, whilst I believe Debian creates individual configuration files for each domains virtualhost directives (I believe with the format “/etc/httpd/conf.d/#####.tld.conf”).
It looks like Certbot was developed for Debian servers, so Certbot assumes your virtualhost directives are under “/etc/httpd/conf.d/#####.tld.conf”.
Unfortunately Certbot currently (August 2017) can not handle Centos 6.9 default setup of all the virtualhost directives being stored within the single “/etc/httpd/conf/httpd.conf” file. If you try to user Certbot with all the directives in the one file, Certbot can’t create the SSL versions (port 443 versions) of the virtualhost directives. Certbot can still create the actual SSL certificates (about 90% of the work required), but it can’t make the relevant conf files on your server (you’d have to make them manually: they are pretty much a copy of the port 80 virtualhost directives with reference to the SSL certs).
If you want Certbot to do all the heavy lifting the first step is pulling out all the virtualhost directives from “/etc/httpd/conf/httpd.conf” and store them inside individual conf files under “/etc/httpd/conf.d/#####.tld.conf”: one conf file for each domain and one for each sub-domain (you don’t need a conf file for serveraliases like www, webmail…).
What’s a Virtualhost Directive?
Virtualhost directives are basically a list of instructions for a specific domain or sub-domain, for example the virtualhost directives for the non-secure (http:// on port 80) version of this site was within the “/etc/httpd/conf/httpd.conf” file and looked like this:
<VirtualHost 166.62.84.189:80>
 SuexecUserGroup "#123" "#123"
 ServerName stallion-theme.co.uk
 ServerAlias www.stallion-theme.co.uk
 ServerAlias webmail.stallion-theme.co.uk
 ServerAlias admin.stallion-theme.co.uk
 DocumentRoot /home/#####/public_html
 ErrorLog /var/log/virtualmin/stallion-theme.co.uk_error_log
 CustomLog /var/log/virtualmin/stallion-theme.co.uk_access_log combined
 ScriptAlias /cgi-bin/ /home/#####/cgi-bin/
 DirectoryIndex index.html index.htm index.php index.php4 index.php5
 <Directory /home/#####/public_html>
 Options -Indexes +IncludesNOEXEC +SymLinksifOwnerMatch +ExecCGI
 allow from all
 AllowOverride All Options=ExecCGI,Includes,IncludesNOEXEC,Indexes,MultiViews,SymLinksIfOwnerMatch
 Action application/x-httpd-php5 /cgi-bin/php5.cgi
 Action application/x-httpd-php5.6 /cgi-bin/php5.6.cgi
 AddType application/x-httpd-php5 .php5
 AddType application/x-httpd-php5.6 .php5.6
 AddType application/x-httpd-php5 .php
 </Directory>
 <Directory /home/#####/cgi-bin>
 allow from all
 AllowOverride All Options=ExecCGI,Includes,IncludesNOEXEC,Indexes,MultiViews,SymLinksIfOwnerMatch
 </Directory>
 RewriteEngine on
 RewriteCond %{HTTP_HOST} =webmail.stallion-theme.co.uk
 RewriteRule ^(.*) https://stallion-theme.co.uk:20000/ [R]
 RewriteCond %{HTTP_HOST} =admin.stallion-theme.co.uk
 RewriteRule ^(.*) https://stallion-theme.co.uk:10000/ [R]
 RemoveHandler .php
 RemoveHandler .php5
 RemoveHandler .php5.6
 php_admin_value engine Off
 RedirectMatch /cgi-bin/mailman/([^/\.]*)(.cgi)?(.*) ##########
 RedirectMatch /mailman/([^/\.]*)(.cgi)?(.*) ##########
 Alias /pipermail /var/lib/mailman/archives/public
 </VirtualHost>
Each directive set starts with
<VirtualHost 166.62.84.189:80>
and ends.
</VirtualHost>
My servers “/etc/httpd/conf/httpd.conf” files had dozens of these sets.
The contents per se isn’t that important for our needs (using Certbot to setup Let’s Encrypt free SSL certificates), what’s important is before running Certbot they are loaded via individual conf files under “/etc/httpd/conf.d/#####.tld.conf” since Certbot can’t handle other setups. If all your virtualhost directives are held in one file (like mine were in Centos 6.9) you have to move them to single files. Basically you create a single file under “/etc/httpd/conf.d/” for each domain AND sub-domains.
For this domain I created this file:
“/etc/httpd/conf.d/stallion-theme.co.uk.conf”
and another file for the sub-domain CDN (I use it as a CDN : Content Distribution Network).
“/etc/httpd/conf.d/cdn.stallion-theme.co.uk.conf”
Then cut the relevant virtualhost codes from the “httpd.conf” file and pasted them into the relevant “stallion-theme.co.uk.conf” and “cdn.stallion-theme.co.uk.conf” files.
If you don’t have any sub-domains you need just the one conf file for each domain.
On naming these conf files, you don’t have to use the domain name format above, but doing so makes it easier to manage as the filenames are related to the domains. As you’ll see below I had to name one conf file with a different format (added a 0 at the start).
Slight Detour for WordPress Domain Mapped Users
On the Centos 6.9 server I’m working on there’s around 80 domains (plus sub-domains) including one WordPress domain mapped site (virtual-light.com) which runs a couple of dozen domains under one WordPress installation: basically 24+ sites like skegness.virtual-light.com (301 redirects to skegness-attractions.co.uk) via one WordPress installation: saves time on maintenance etc…
My plan was to move the virtualhost directives one by one from “/etc/httpd/conf/httpd.conf” to individual files under “/etc/httpd/conf.d/#####.tld.conf” and setup SSL certificates one at a time as I moved the directives.
I’d have the virtualhost directives I’d not moved yet within the “httpd.conf” file and a growing list of individual conf files in “/etc/httpd/conf.d/” as I created new SSL certs-
/etc/httpd/conf.d/domain1.com.conf
/etc/httpd/conf.d/domain2.com.conf
/etc/httpd/conf.d/domain3.net.conf
/etc/httpd/conf.d/domain4.co.uk.conf
….
Eventually all the directives would be moved and none would be left within the “httpd.conf” file.
Didn’t quite go to plan and my first attempts to make SSL certificates one by one didn’t work (not a fault with Certbot, but what looks like a Centos bug)!
The domain mapped domain (virtual-light.com) requires it being set as the main domain for the IP used (the IP is shared with other domains) otherwise the domain mapping fails (when loading the IP address in a browser http://123.456.789.01 the main domain loads) and this caused major headaches during setup (think I found a Centos bug).
After a lot of testing and head scratching I realised couldn’t leave a single virtualhost directive within the “/etc/httpd/conf/httpd.conf” file AND the WordPress domain mapped conf file for virtual-light.com had to be the first one (alphabetically) found under “/etc/httpd/conf.d/”!!!
If these two conditions weren’t met the domain mapped domains mapped to the wrong domain AND Centos used the first domain it found in the first virtualhost directive it loaded (the first directive conf file under “/etc/httpd/conf.d/” as they are listed alphabetically).
What a weird setup/bug???
Since I didn’t want to have to make 60+ conf files while testing I temporarily moved all the virtualhost directives to a single file “/etc/httpd/conf.d/virtualhosts.conf” (none were left inside httpd.conf) and put the domain mapped directives within “/etc/httpd/conf.d/0virtual-light.com.conf” so when I viewed the folder it looked like this:
0virtual-light.com.conf (had to be the first alphabetically)
domain1.com.conf
domain2.com.conf
domain3.net.conf
domain4.co.uk.conf

Individual Virtualhost Directives Configuration Files
I could then create the individual virtualhost directive conf files one by one: though in the end I created them all before trying again to create SSL certificates :-)
David Law
Website - SEO Gold Services